Chaos Monkey for Spring Boot를 이용하여 사용하는 애플리케이션에 어떻게 적용하는지를 알아보도록 하겠습니다.
아래 소스는 모두 Github에사 확인할 수 있습니다. - 소스
설정
Spring Boot를 사용하고 있다면 쉽게 추가할 수 있습니다.
개발 환경
- IDE : Intelij 2021.2.2
- JDK : 1.8
- Spring Boot : 2.5.8
Gradle
기존 사용하는 프로젝트안에 아래 2개의 라이브러리를 추가해주면 됩니다.
dependencies {
  ...
  implementation 'org.springframework.boot:spring-boot-starter-actuator'
  implementation 'de.codecentric:chaos-monkey-spring-boot:2.5.4'
  ...
}
application.yml
기존 사용하고 있는 yml 또는 properites가 있다면 chaos-moneky profile 추가합니다.
기존에 yml 파일안 dev 환경에다가 추가하였고 기본 설정을 chaos-monkey로 설정하였습니다.
spring:
  profiles:
    active: chaos-monkey

---
spring:
  config:
    activate:
      on-profile: chaos-monkey

  jpa:
    hibernate:
      ddl-auto: create
    properties:
      hibernate:
        format_sql: true
    show-sql: false


management:
  endpoint:
    chaosmonkey:
      enabled: true

  endpoints:
    web:
      exposure:
        # include specific endpoints
        include:
          - health
          - info
          - chaosmonkey

logging:
  level:
    org.hibernate.SQL: debug
    org.hibernate.type: trace

---
spring:
  config:
    activate:
      on-profile: dev

  jpa:
    hibernate:
      ddl-auto: create
    properties:
      hibernate:
        format_sql: true
    show-sql: false

logging:
  level:
    root: trace
    org.hibernate.SQL: debug
    org.hibernate.type: trace
application 실행
설정 후 애플리케이션을 실행하면 다음과 같은 로고가 나타나게 됩니다.
     _____ _                       __  __             _
    / ____| |                     |  \/  |           | |
   | |    | |__   __ _  ___  ___  | \  / | ___  _ __ | | _____ _   _
   | |    | '_ \ / _` |/ _ \/ __| | |\/| |/ _ \| '_ \| |/ / _ | | | |
   | |____| | | | (_| | (_) \__ \ | |  | | (_) | | | |   |  __| |_| |
    \_____|_| |_|\__,_|\___/|___/ |_|  |_|\___/|_| |_|_|\_\___|\__, |
                                                                __/ |
    _ready to do evil!                                         |___/

:: Chaos Monkey for Spring Boot                                    ::
chaos monkey 활성화 여부, watchers 설정 , assaults 설정은 여러가지 방법을 제공합니다.
Configuration클래스 파일을 이용yml또는properties를 이용해서 설정- HTTP API 호출을 활용하여서도 설정
금일은 마지막 HTTP API 를 이용하여서 설정 및 테스트하는 방법을 설명드리겠습니다.
HTTP Endpoint
yml 설정을 진행하셨다면 아래 기본 url을 이용해서 테이블에 있는 endpoint를 붙여서 호출하면 됩니다.
| ID | Description | Methods |
|---|---|---|
| /chaosmonkey | Running Chaos Monkey configuration | GET |
| /chaosmonkey/status | Is Chaos Monkey enabled or disabled? | GET |
| /chaosmonkey/enable | Enable Chaos Monkey | POST |
| /chaosmonkey/disable | Disable Chaos Monkey | POST |
| /chaosmonkey/watchers | Running Watchers configuration. | GET |
| /chaosmonkey/watchers | Change Watchers Configuration | POST |
| /chaosmonkey/assaults | Running Assaults configuration | GET |
| /chaosmonkey/assaults | Change Assaults configuration | POST |
| /chaosmonkey/assaults/runtime/attack | Execute configured runtime Assault | POST |
❗️참고
Chaos Monkey HTTP_Endpoint
설정은 어느 정도 끝났으니 이제 watcher 및 assaults 설정에 대해서 알아보도록 하겠습니다.
❗️참고
Assaults를 활성화하기 전에, choas-monkey를 활성화를 먼저 진행해야 합니다. 당연한 이야기지만 서버가 내려간다면 값은 초기화되며 default값이 됩니다. choas-monkey 활성화 default 값은 false 입니다. 이것이 불편하다면 Configuration을 구성해서 초기값을 설정할 수 있습니다.
Watcher
Watcher Type에 활성화되어 있는 조건을 애플리케이션의 빈을 스캔하여서 찾습니다.
Watcher 설정
- 요청
  POST http://localhost:8080/actuator/chaosmonkey/watchers
  Content-Type: application/json

  {
    "controller": false,
    "restController": true,
    "service": false,
    "repository": false,
    "component": false,
    "restTemplate": false,
    "webClient": false,
    "actuatorHealth": false
}- 응답
  HTTP/1.1 200
  Content-Type: text/plain;charset=UTF-8
  Content-Length: 26
  Date: Sat, 12 Feb 2022 05:07:54 GMT
  Keep-Alive: timeout=60
  Connection: keep-alive

  Watcher config has changed

  Response code: 200; Time: 296ms; Content length: 26 bytes
Watcher 설정 정보 조회
- 요청
GET http://localhost:8080/actuator/chaosmonkey/watchers- 응답
  HTTP/1.1 200
  Content-Type: application/json
  Transfer-Encoding: chunked
  Date: Sat, 12 Feb 2022 05:09:02 GMT
  Keep-Alive: timeout=60
  Connection: keep-alive

  {
    "controller": false,
    "restController": true,
    "service": false,
    "repository": false,
    "component": false,
    "restTemplate": false,
    "webClient": false,
    "actuatorHealth": false,
    "beans": []
  }

  Response code: 200; Time: 38ms; Content length: 168 bytes
Assaults
Assaults는 Chaos Monkey의 핵심입니다.
다음의 공격을 제공합니다.
- Request Assaults
- Runtime Assaults
Request Assaults
- 이 공격은 응용 프로그램의 특정 지점을 공격합니다.
- 공격하기 위해서는 감시자 설정이 되어 있어야 합니다.
- 감시자 설정은 위에 정리된 내용을 참고바랍니다.
- 2가지의 공격 유형을 제공합니다.
Latency AssaultsException Assaults
Latency Assaults
- 지연 공격이 활성화된 경우 대기 시간이 요청에 추가됩니다.
- 요청 파라미터에
level을 통해 이 작업이 수행되어야 하는 요청 수를 제어합니다.level = 1이라면 1번 호출할때 1번 지연 응답이 설정된다는 뜻입니다.level = 5라면 5번 호출될때 5번 마지막에 지연 응답이 설정된다는 뜻입니다.
지연 공격 활성화하는 단계
chaos-monkey활성화 호출watcher설정 호출latency assaults설정 호출- 해당 클래스/메소드 호출
2가지 지연 공격에 대해서 알아보도록 하겠습니다.
실습에서 http api 호출시 intellij에서 제공하는 .http 를 사용하였습니다.
@RestConstructor 호출시 지연 공격 설정
chaos-monkey활성화 호출
POST http://localhost:8080/actuator/chaosmonkey/enablewatcher설정 호출
   POST http://localhost:8080/actuator/chaosmonkey/watchers
   Content-Type: application/json

   {
     "controller": false,
     "restController": true,
     "service": false,
     "repository": false,
     "component": false,
     "restTemplate": false,
     "webClient": false,
     "actuatorHealth": false
   }
latency assaults설정 호출
   POST http://localhost:8080/actuator/chaosmonkey/assaults
   Content-Type: application/json

   {
     "level": 1,
     "latencyRangeStart": 5000,
     "latencyRangeEnd": 10000,
     "latencyActive": true
}level은 이 작업이 수행되어야 하는 요청 수를 제어합니다. 1이라고 설정되어 있기 때문에 요청당 무조건 지연 설정이 적용됩니다.latencyRangeStart최소 지연 시간입니다. 여기서는 5000(ms)으로 설정하였습니다.latencyRangeEnd최대 지연 시간입니다. 여기서는 10000(ms)으로 설정하였습니다.latencyActive은 지연 공격 활성화 여부입니다. 기본값은false입니다.
- 해당 클래스/메소드 호출
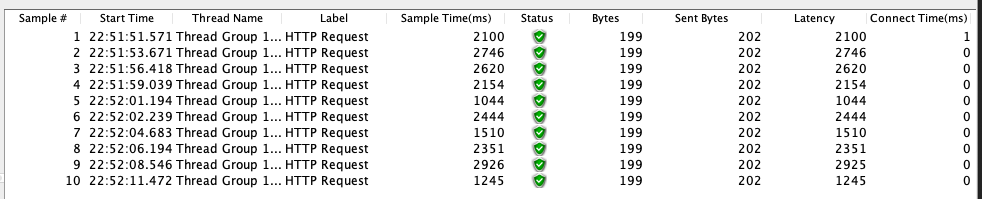
- jmeter를 활용하여서 10번 호출하였습니다.
- 결과 시간을 보면 5000(ms) ~ 10000(ms) 사이인 것을 확인할 수 있습니다.

특정 메소드 지연 공격 설정
chaos-monkey활성화 호출watcher설정 호출latency assaults설정 호출
   POST http://localhost:8080/actuator/chaosmonkey/assaults
   Content-Type: application/json

   {
     "level": 1,
     "latencyRangeStart": 1000,
     "latencyRangeEnd": 3000,
     "latencyActive": true,
     "watchedCustomServices": [
       "chaos.engineering.controller.GoodByeController.goodBye"
     ]
}- 해당 클래스/메소드 호출
watcher가 활성화 되어 있고watchedCustomServices의 특정 메소드를 설정하였다면 해당 메소드만 지연 설정이 됩니다.- 결과 시간을 보면 1000(ms) ~ 3000(ms) 사이인 것을 확인할 수 있습니다.
Exception Assaults
- 메서드를 사용할 때 예외 발생 여부를 런타임에 결정할 수 있습니다.
예외 공격 활성화하는 단계
chaos-monkey활성화 호출watcher설정 호출exception assaults설정 호출
   POST http://localhost:8080/actuator/chaosmonkey/assaults
   Content-Type: application/json

   {
     "latencyActive": false,
     "exceptionsActive": true,
     "killApplicationActive": false,
     "exception": {
       "type": "java.lang.RuntimeException",
       "arguments": null
     }
}exception은type,arguments작성할 수 있습니다. 여기서는type만 작성하였습니다.
- 해당 클래스/메소드 호출
   HTTP/1.1 500
   Content-Type: application/json
   Transfer-Encoding: chunked
   Date: Sat, 12 Feb 2022 14:39:11 GMT
   Connection: close

   {
     "timestamp": "2022-02-12T14:39:11.442+00:00",
     "status": 500,
     "error": "Internal Server Error",
     "path": "/goodbye"
   }
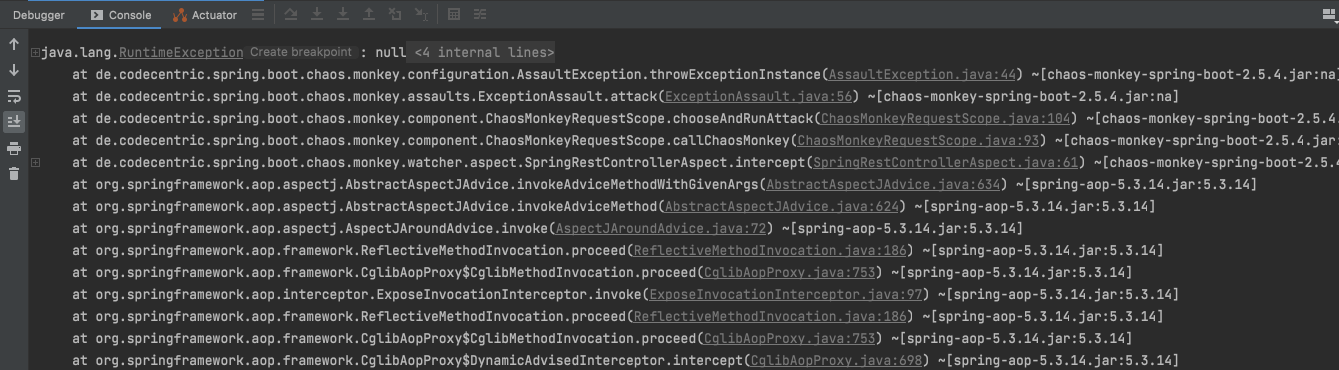
Response code: 500; Time: 441ms; Content length: 108 bytes- 의도한 대로 서버에서 에러가 발생하였습니다.
HttpStatusCode가 500인 서버에러입니다.
- 로그 결과
Runtime Assaults
- 이 공격은 애플리케이션 전체를 공격합니다.
- 다음의 공격을 제공합니다.
Memory AssaultsAppKiller AssaultsCPU Assaults
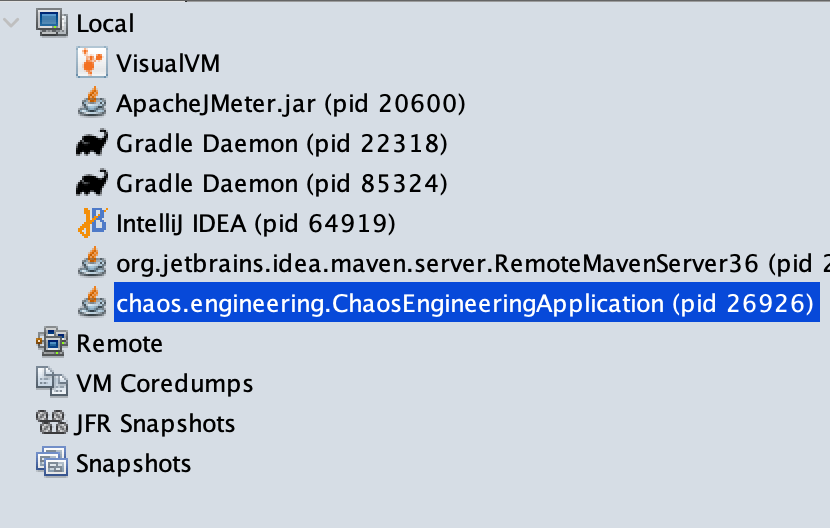
여기서 Memory, CPU 가 증가되는 부분을 보기 위해서 VisualVM을 활용하도록 하겠습니다.
사용방법은 VisualVM 실행 후 스프링 부트 애플리케이션을 시작하면 아래 그림처럼 해당 프로세스가 나타납니다.
Memory Assaults
JVM의 메모리를 공격합니다.
메모리 공격은 사용 중인 Java 버전에 따라 크게 달라지며, 각 Java 버전의 기본 garbage 수집기로 테스트할 수 있습니다.
Java 8에서 채우기 속도는 슬라이스당 256MB로 제한됩니다!
메모리 공격 활성화하는 단계
chaos-monkey활성화 호출memory assaults설정 호출
   POST http://localhost:8080/actuator/chaosmonkey/assaults

   Content-Type: application/json

   {
     "memoryActive": true,
     "memoryMillisecondsHoldFilledMemory": 90000,
     "memoryMillisecondsWaitNextIncrease": 1000,
     "memoryFillIncrementFraction": 0.15,
     "memoryFillTargetFraction": 0.25
}memoryActive는 메모리 공격 활성화유무입니다. 기본값은false입니다.memoryMillisecondsHoldFilledMemorymemoryMillisecondsWaitNextIncreasememoryFillIncrementFractionmemoryFillTargetFraction
runtime attack호출
POST http://localhost:8080/actuator/chaosmonkey/assaults/runtime/attack- VisualVM 결과
- 메모리 공격 시작전 현황입니다.
-
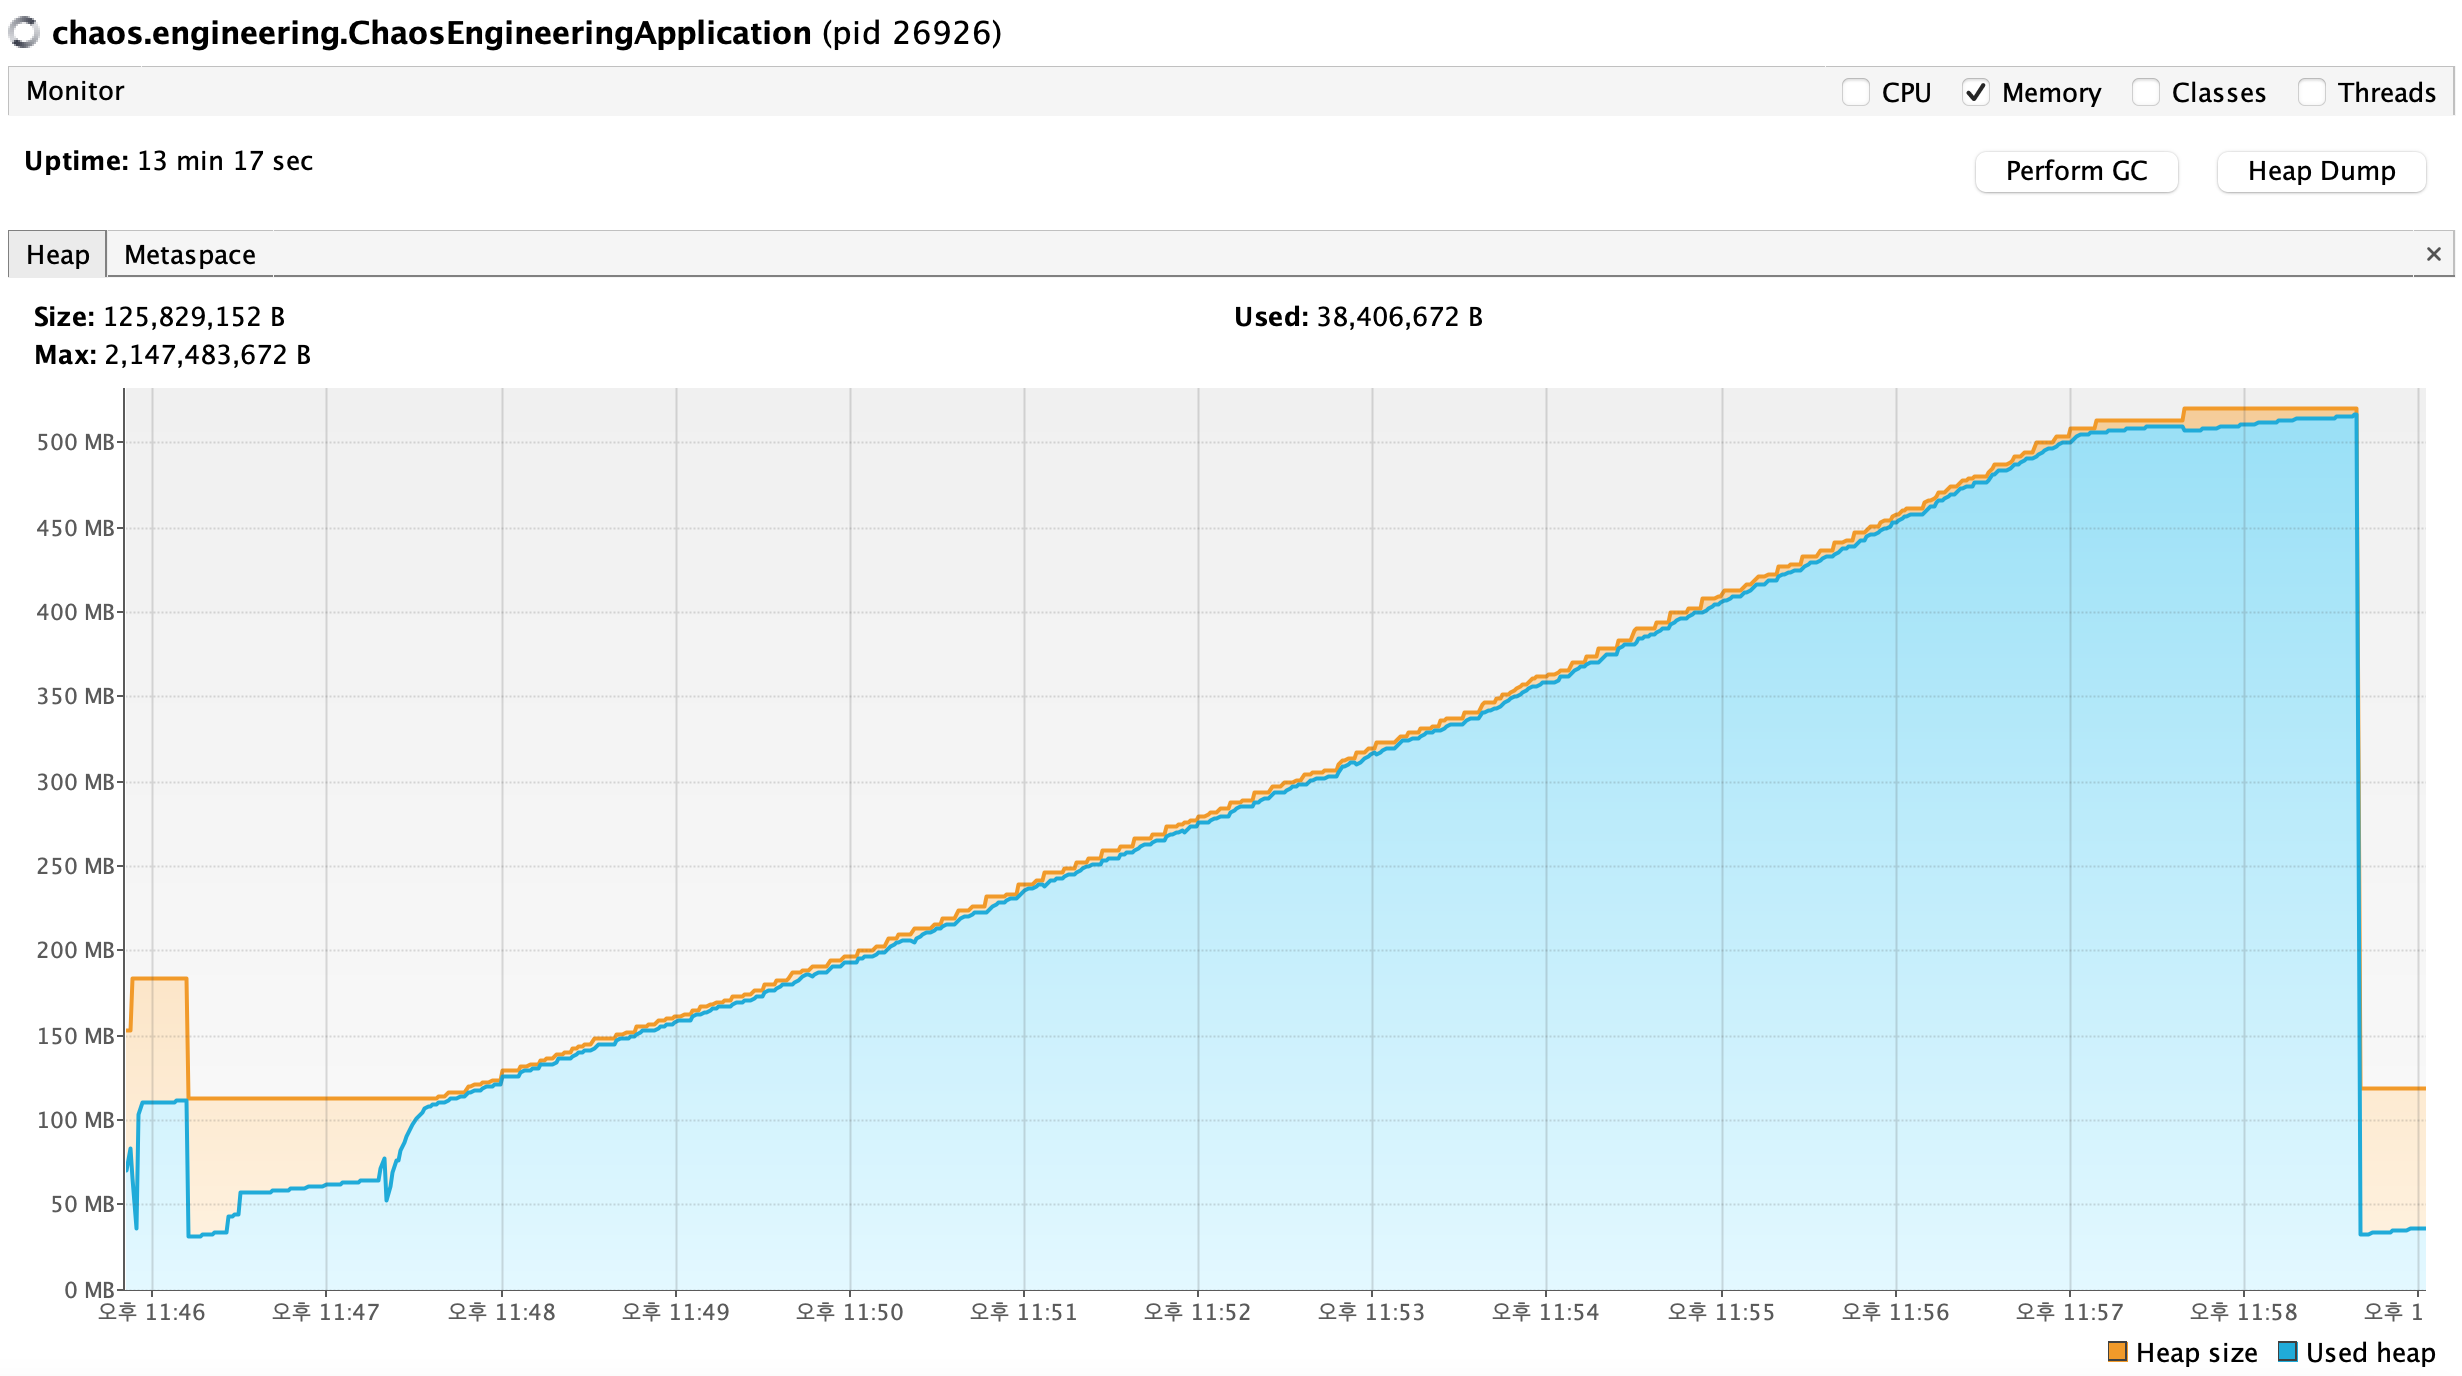
- 메모리 공격 후 현황을 보면 그래프가 올라가는 것을 확인할 수 있습니다.
-
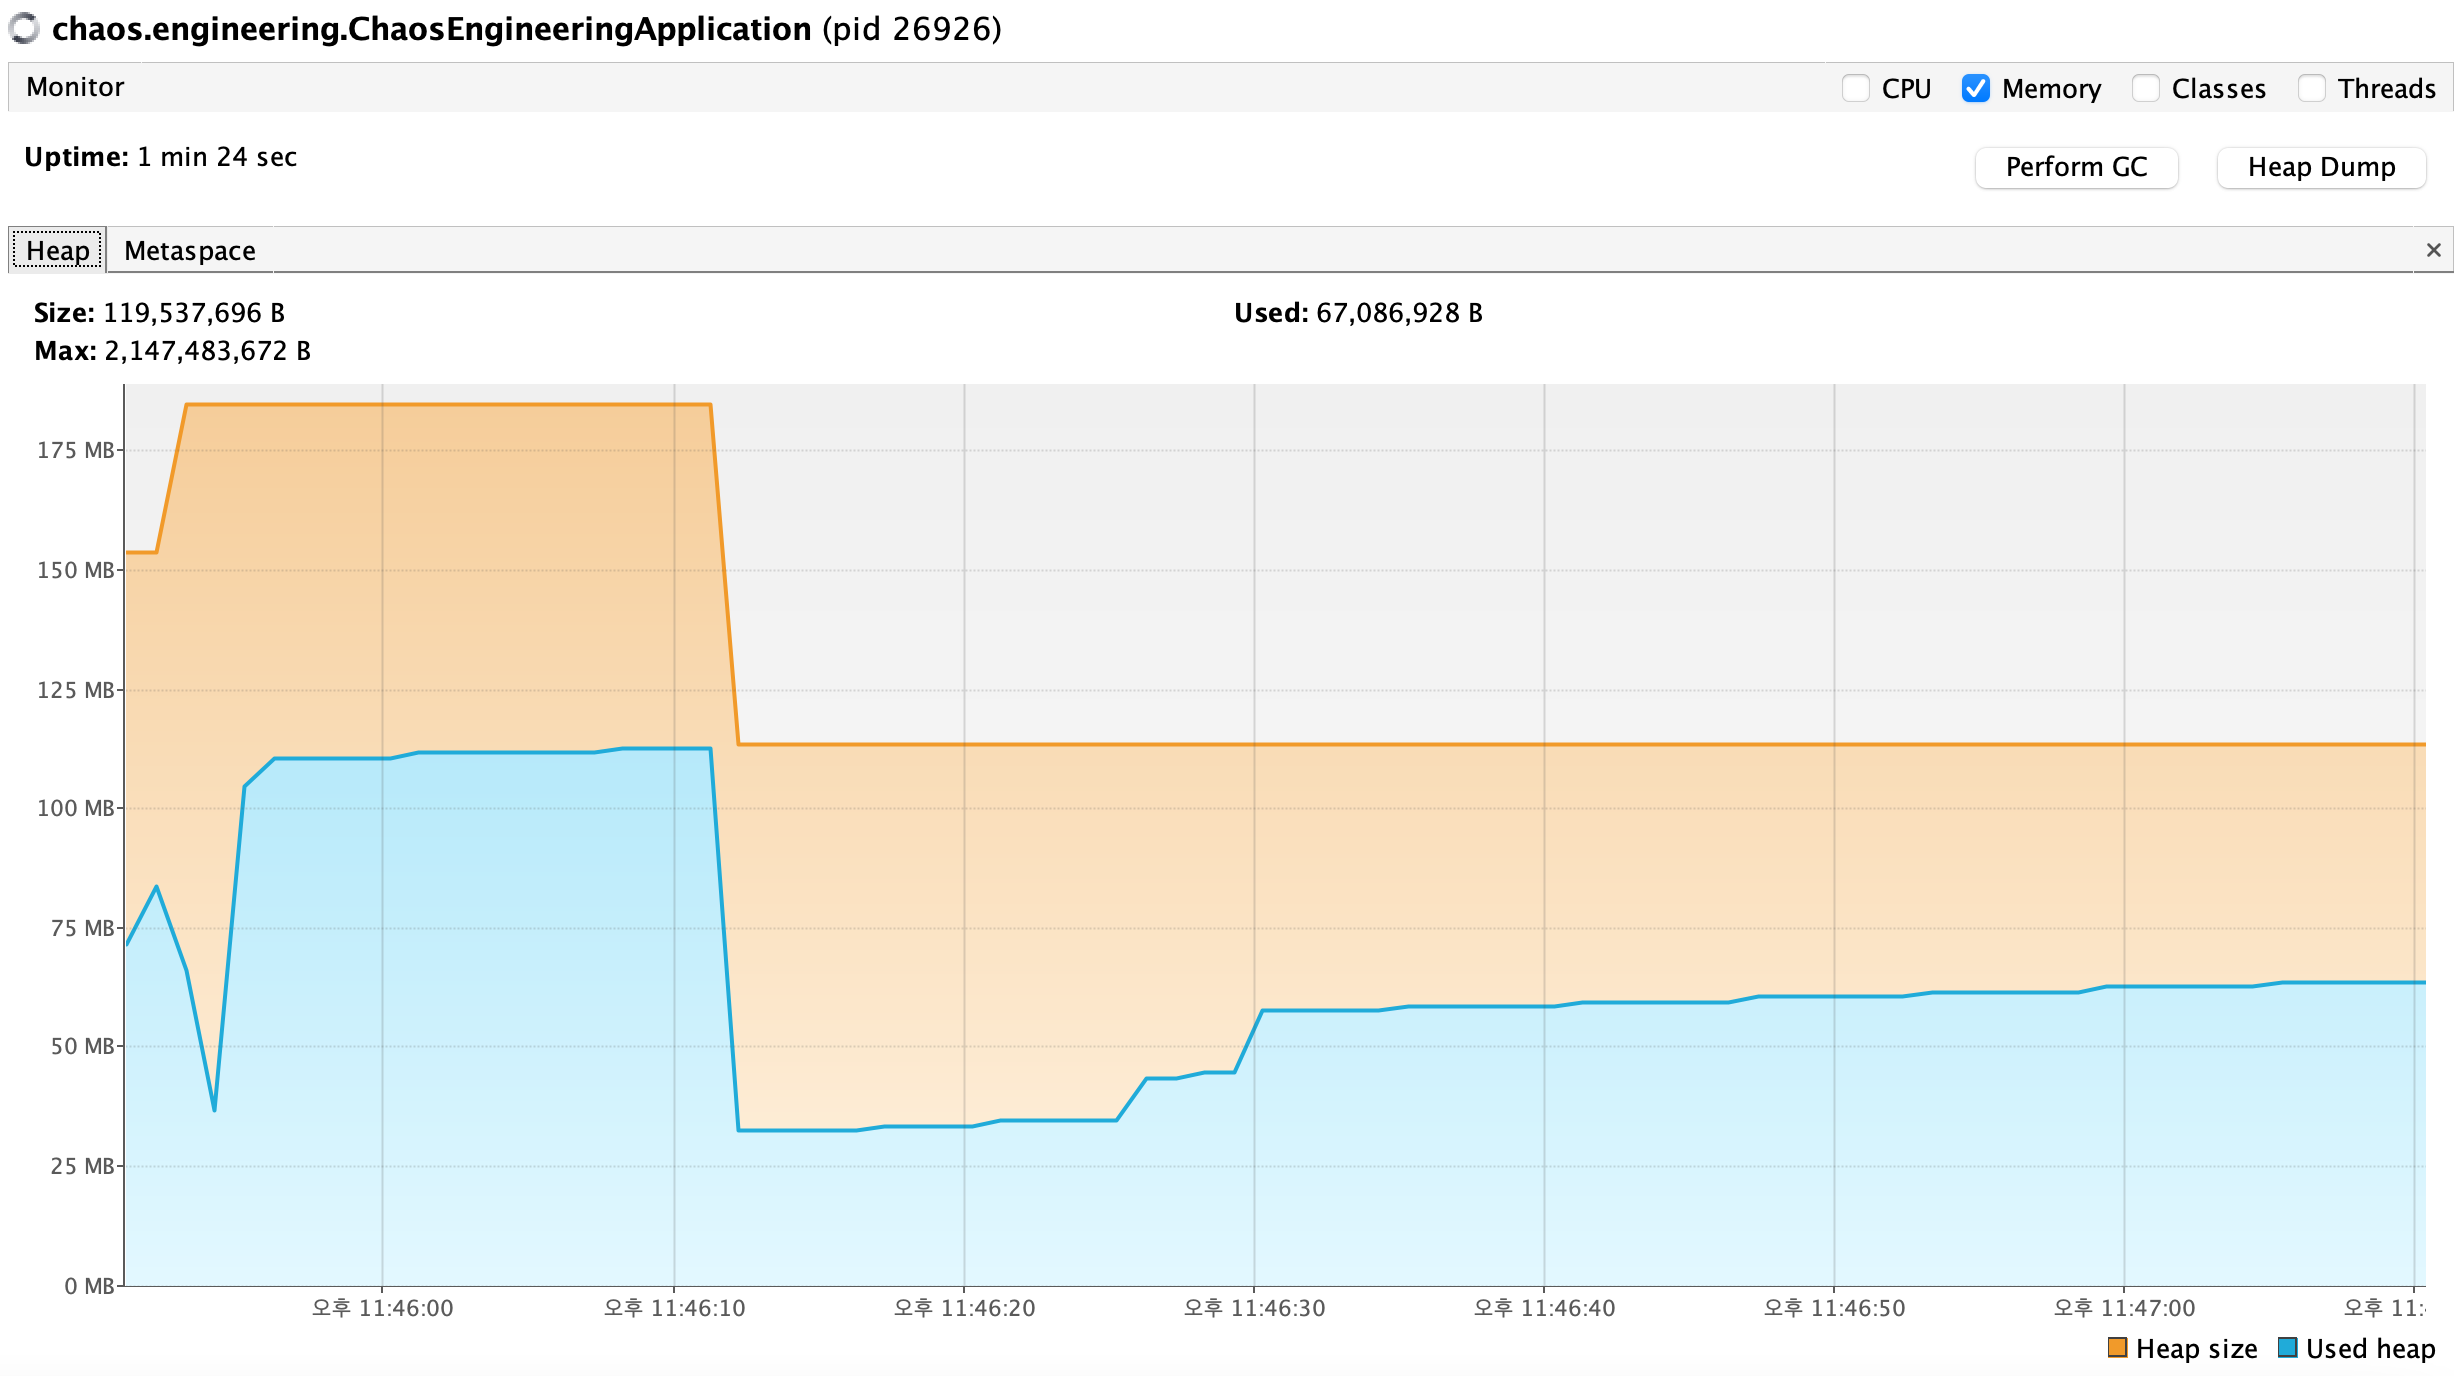
- 로그 결과
- 메모리 공격 시작을 알리고 메모리가 꽉 차면 잠시 대기했다가 메모리 클린을 합니다.

- 메모리 공격 시작을 알리고 메모리가 꽉 차면 잠시 대기했다가 메모리 클린을 합니다.
AppKiller Assaults
설정을 통해 해당 애플리케이션을 종료합니다.
애플리케이션 종료 공격 활성화하는 단계
chaos-monkey활성화 호출appkiller assaults설정 호출
   POST http://localhost:8080/actuator/chaosmonkey/assaults
   Content-Type: application/json

   {
     "killApplicationActive": true
}killApplicationActive는 앱 종료를 활성호압니다. 기본값은false입니다.
runtime attack호출
POST http://localhost:8080/actuator/chaosmonkey/assaults/runtime/attack- 로그 결과
runtime attack호출과 동시에 애플리케이션 종료 공격을 하고 해당 애플리케이션은 종료됩니다.
CPU Assaults
JVM의 CPU를 공격합니다.
CPU 공격 활성화하는 단계
chaos-monkey활성화 호출cpu assaults설정 호출
   POST http://localhost:8080/actuator/chaosmonkey/assaults
   Content-Type: application/json

   {
     "cpuActive": true,
     "cpuMillisecondsHoldLoad": 90000,
     "cpuLoadTargetFraction": 0.9,
     "cpuCronExpression": "OFF"
}cpuActive는 메모리 공격 활성화유무입니다. 기본값은false입니다.cpuMillisecondsHoldLoadcpuLoadTargetFractioncpuCronExpression
runtime attack호출- VisualVM 결과
- 이미지는 추후에 업로드…
- 로그 결과

'프로그래밍이야기 > Spring' 카테고리의 다른 글
| [Springboot] 어플리케이션 환경설정 profile 별 관리방법 (3) | 2022.06.23 |
|---|---|
| [Spring] Injection 정리 (0) | 2022.02.14 |
| [Chaos Engineering] 개념 정리 (0) | 2022.02.13 |
| Spring Boot Cache 적용 (0) | 2022.01.30 |
| [Spring Boot] 지원 버전 확인하기 (0) | 2022.01.23 |

댓글